


Hi everyone,
We work with databases as software developers. They are a big part of the development life cycle.
At the beginning of the project, you easily handle database changes, but you will get into trouble later. There are many changes to the database we worked on like adding new columns, tables, etc. That means you have a lot of changes and you will not be able to manage them quickly. At this time, you should use a tool for versioning your database schema changes.
There are many tools for your needs, Liquibase is one of the most known tools for database schema versioning. Throughout this post, I will look into the Liquibase with a small application.
What is Liquibase?
Liquibase is an open-source project that helps you manage database schema changes. The project was started in 2006. That tool helps a lot in the development process. Especially agile software development. This is extremely important when working on agile software development.
Positive Sides of Using Liquibase
- Liquibase reduced manual changes for your database. You will not have to spend additional time on database scripts.
- Liquibase provides easy version control on database changes. It is easy to roll back changes if it is necessary.
- Liquibase supports
XML, YML, SQL and JSONformats. - Liquibase works with many databases like Oracle, SQL Server, PostgreSQL, etc.
There are a few positive sides to using Liquibase.
I have created a simple project to show you how to use a Liquibase with Java. Let me explain how to use Liquibase.
Demo
I will connect to PostgreSQL database and create a table, which name is tbl_user. Then I will create and modify this table with Liquibase. Before beginning coding, you should run a PostgreSQL database instance. I will use it with Docker like below.
docker run --name postgresql-container -p 5432:5432 -e POSTGRES_PASSWORD=liquibasedemo -d postgres
Configuration and Create Table
First of all, create a Java Spring Boot app from Spring initializr. You can access the project's Github repository.
Add Liquibase dependency to the pom.xml file like below.
<dependency>
    <groupId>org.liquibase</groupId>
    <artifactId>liquibase-core</artifactId>
</dependency>
Then you should modify your application.yml file. You should add Liquibase change log master file path in the configuration. Then you can create a directory db/changelog in the resources directory in the project.
change-log file path is important. Because Liquibase will look at this file for versioning your changes.
spring:
  jpa:
    database: postgresql
    show-sql: true
    hibernate:
      ddl-auto: update
  profiles:
    default: dev
  datasource:
    url: jdbc:postgresql://localhost:5432/postgres
    username: postgres
    password: liquibasedemo
  liquibase:
    change-log: classpath:/db/changelog/changelog-master.xml
    enabled: true
server:
  port: 8080
Create a tbl_user class, which name is User.
@Table(name = "tbl_user")
public class User {
    @Id
    @Column(name = "id")
    private int id;
    @Column(name = "user_name")
    private String userName;
    @Column(name = "password")
    private String password;
    // getters and setters
}
The tbl_user table will not exist if you run the project directly. Because nothing did specify to the application that this table and its property were to be created. In this case, Liquibase will identify the tbl_user table to the application through some configuration.
Create an XML file in db/changelog/<user-table-data>.xml. My file name is user-table-data.xml. The Liquibase detects your changes with the <changeSet> tag. You can define your needs below.
<?xml version="1.0" encoding="UTF-8"?>

<databaseChangeLog
        xmlns="http://www.liquibase.org/xml/ns/dbchangelog"
        xmlns:xsi="http://www.w3.org/2001/XMLSchema-instance"
        xsi:schemaLocation="http://www.liquibase.org/xml/ns/dbchangelog
         http://www.liquibase.org/xml/ns/dbchangelog/dbchangelog-3.1.xsd">

    <changeSet id="01" author="coderkan">
        <createTable tableName="tbl_user">
            <column name="id" type="int" autoIncrement="true">
                <constraints nullable="false" unique="true" primaryKey="true" />
            </column>
            <column name="user_name" type="varchar(255)">
                <constraints  nullable="false" unique="true" />
            </column>
            <column name="password" type="varchar(1024)">
                <constraints nullable="false"/>
            </column>
        </createTable>
    </changeSet>
</databaseChangeLog>
After creating the XML file, you should import the file's path to your changelog-master.xml file. Because Liquibase will look up the changes in this file.
<?xml version="1.0" encoding="utf-8"?>
<databaseChangeLog
        xmlns="http://www.liquibase.org/xml/ns/dbchangelog"
        xmlns:xsi="http://www.w3.org/2001/XMLSchema-instance"
        xsi:schemaLocation="http://www.liquibase.org/xml/ns/dbchangelog http://www.liquibase.org/xml/ns/dbchangelog/dbchangelog-3.6.xsd">

    <include file="db/changelog/user-table-data.xml"/>
</databaseChangeLog>
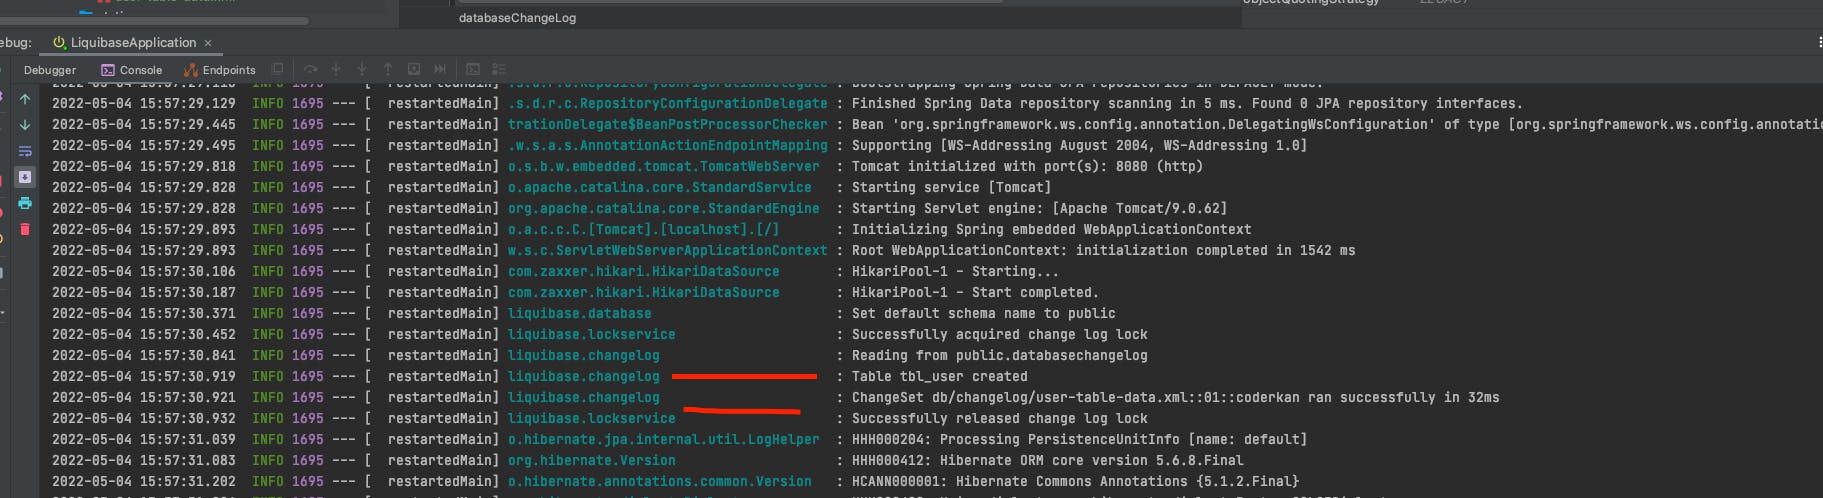
When you run the application, you will see the outputs below. Liquibase will create a table and report you as output.
Insert Data to Table
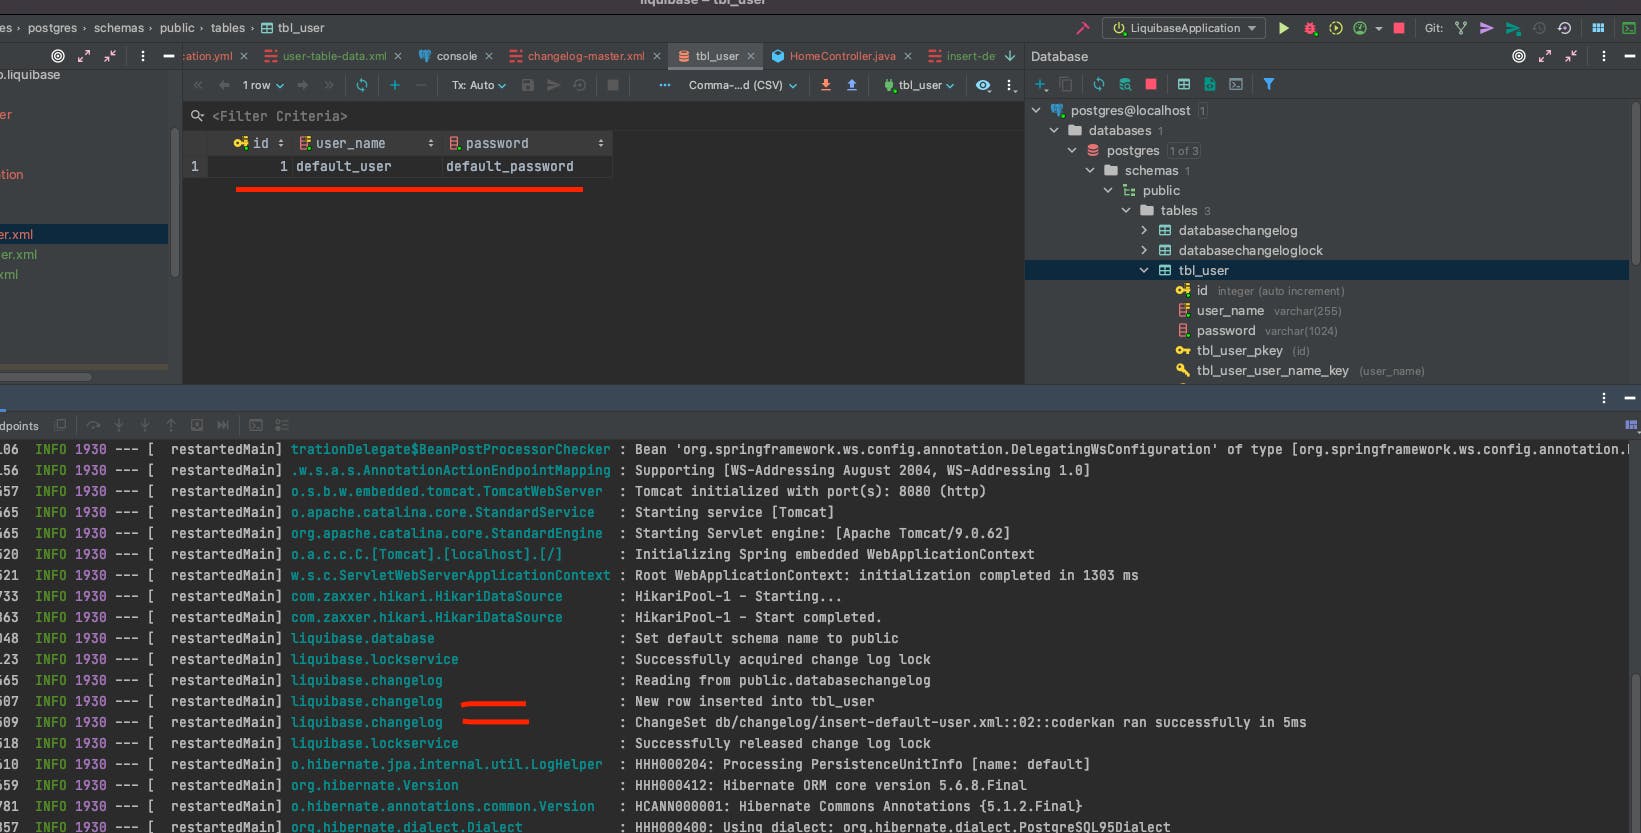
In this section, I will show you how to add data to the database. I have created a file whose name is insert-default-user.xml. Then I added the following data. <insert tag will generate an insert SQL query for your database, then insert it into the database.
    <changeSet id="02" author="coderkan">
        <insert tableName="tbl_user">
            <column name="user_name" value="default_user"/>
            <column name="password" value="default_password"/>
        </insert>
    </changeSet>
After adding the above data to your .xml file, you should include the changelog-master.xml with <include file="db/changelog/insert-default-user.xml"/>. You will see the output when you run your application like below, then refresh your database and fetch the data. That's all for adding value to the database.
Modify Table
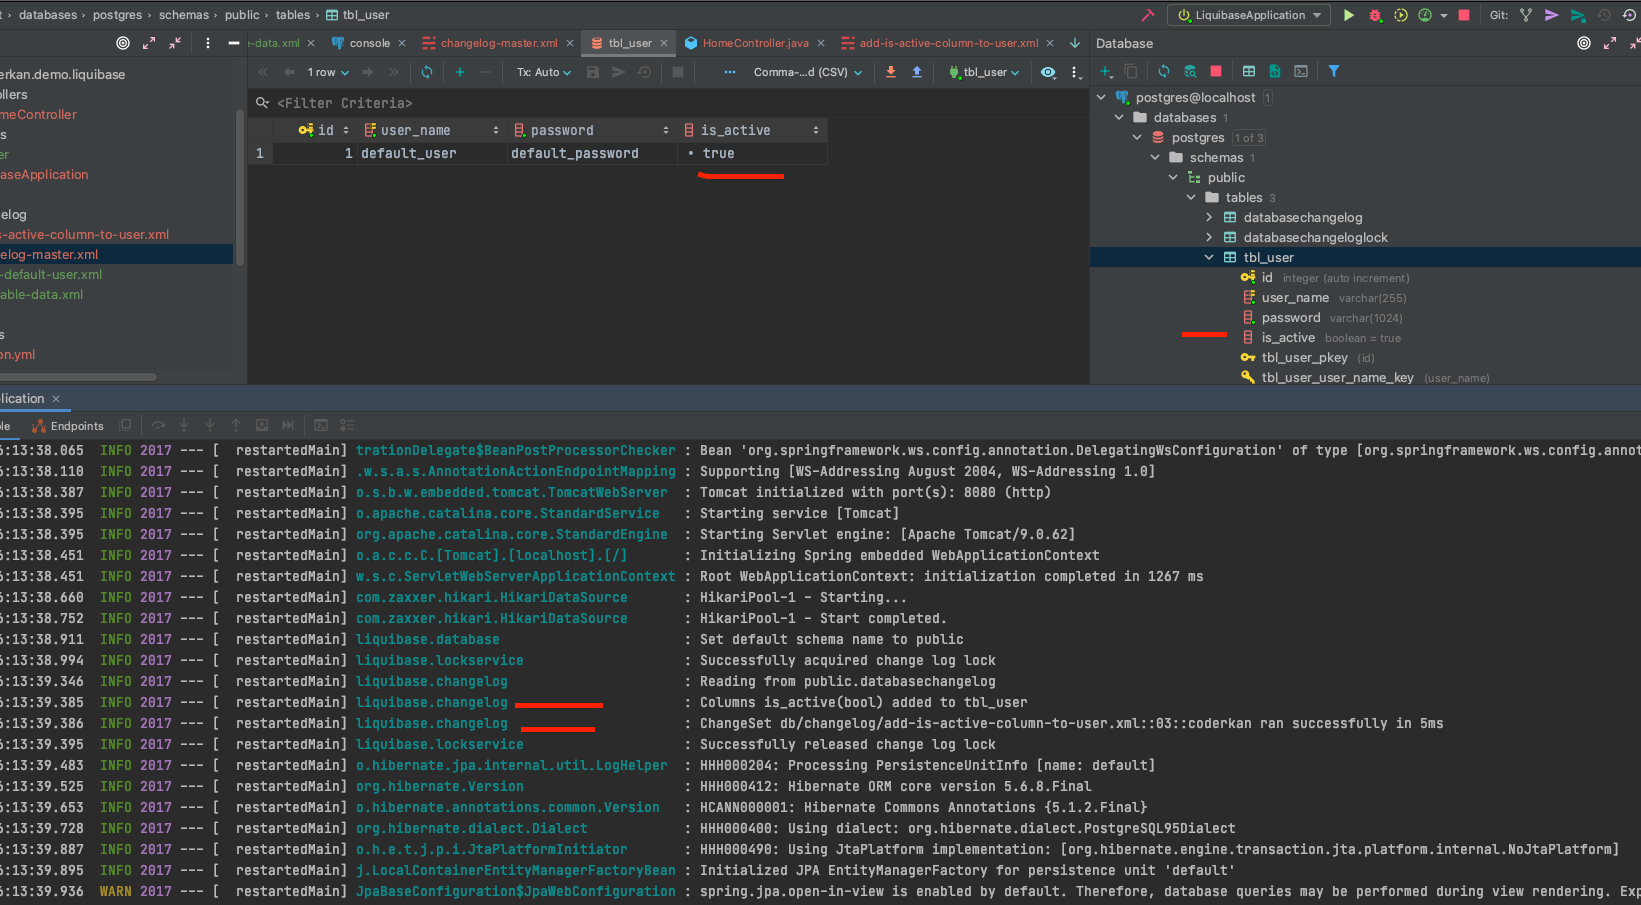
When you need to modify your table like adding a new column, removing a new column, etc, Liquibase will help you easily. You can easily modify the table you created. I will add a new column and give it a default value. I have created a file add-is-active-column-to-user.xml. You can add the following <changeSet. It is adding a new column as is_active and giving it a value with defaultValue. It's easy to modify the table you have created.
    <changeSet id="03" author="coderkan">
        <addColumn tableName="tbl_user">
            <column name="is_active" type="bool" defaultValue="true"></column>
        </addColumn>
    </changeSet>
Then, change your Entity class.
@Table(name = "tbl_user")
public class User {
    @Id
    @Column(name = "id")
    private int id;
    @Column(name = "user_name")
    private String userName;
    @Column(name = "password")
    private String password;
    // add new column
    @Column(name = "is_active")
    private boolean isActive;
    // getters and setters
}
Adding the file path to your changelog-master.xml file.
<include file="db/changelog/add-is-active-column-to-user.xml"/>
When you start your application, you will see the needed outputs like below.
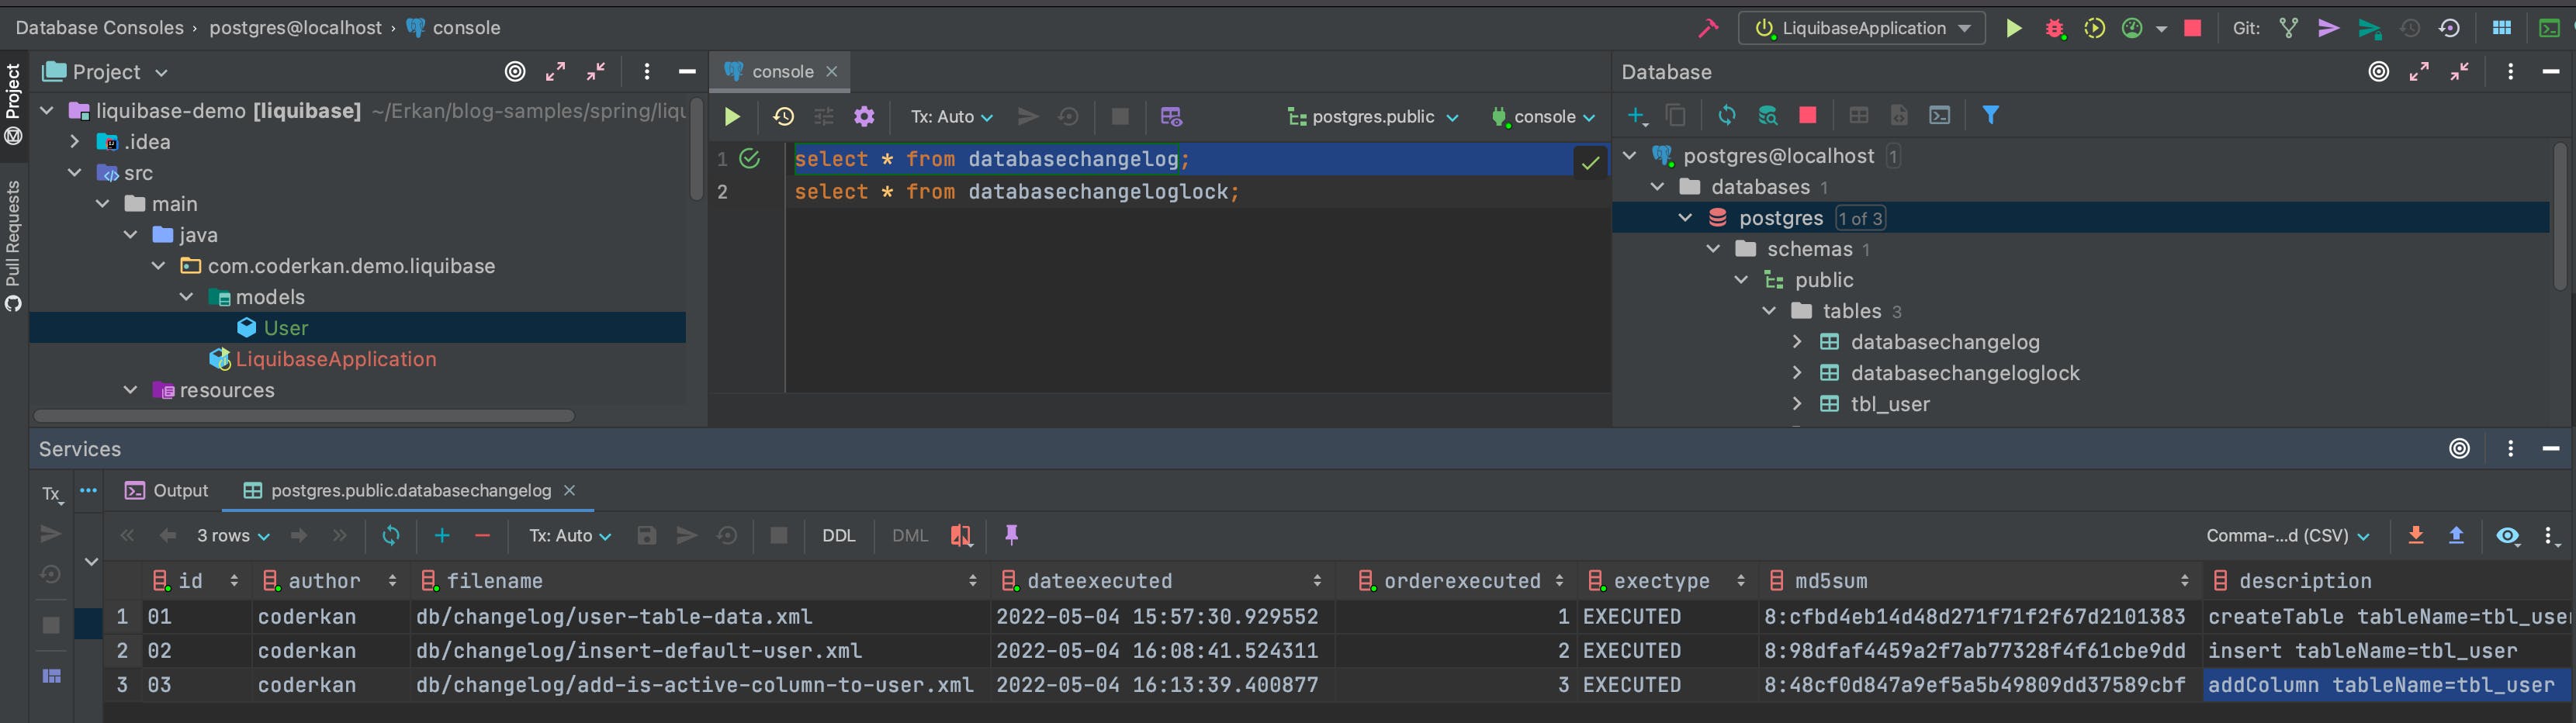
ChangeLog DB Table.
Liquibase has two tables databasechangelog and databasechangeloglock. The tables record all you add to the database as a changelog. When your code executed, then it is added to the databasechangelog. That table ensures that the command you added will run once.
Conclusion
Versioning the database is really important while the development process. In this post, I am trying to give you a simple demo of using the Liquibase. You can do more with Liquibase and it's easy to use. It has more features, You can also check the official website for more information.
I hope you enjoy reading.
Have a nice coding.